The Curiosity Boxes are aimed at 7- 11 year olds, so my in-house 'cadets' DD (9) and DS (8) were the perfect age to assist me 😊
The box contained 3 activities/ experiments for us to do. Instructions, Fact Cards & Materials are all included. For some activities you will need a few items from home but these are genuinely items you will have - such as spoon, mixing bowl and pens/ pencils. Other than that, everything you need is included so you should be able to literally open your box and get stuck straight in. The instructions are easy to follow, there is some basic safety information, but generally speaking the kids can get stuck in and do it themselves - there is no lengthy paperwork for the grown ups to wade through first (yay!).
Our first experiment was Sparky Sculptures -
Unfortunately we'd had a bit of a salt explosion in transit! But everything still worked after a quick wipe off and there was enough of every ingredient that it didn't matter we had lost a bit.
The mission was to make 'conductive' and 'insulating' play-doughs -
Food colouring was included, so we were able to colour our conductive dough, and leave plain out insulating dough -
Both types of dough were easy to make following the instructions.
We then tested our doughs by making electrical circuits to light up LEDs (all provided with the kit) -
After successfully completing our circuits we then had a go at creating series circuits and parallel circuits (Mummy learnt something new with this one!!) Out parallel circuit was a great success -
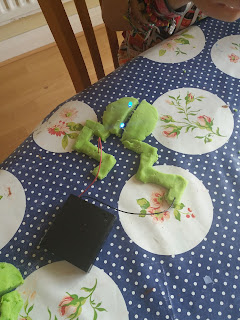
After this, the cadets were inspired to have a go at making their own circuits with the conductive play-dough. DS made an erupting volcano -
And DD decided to test the circuit's effectiveness with a series of twists and turns -
When we were finished, we packed up the reusable bits (removing and safely storing the batteries) and the play-dough we kept wrapped up in the fridge. A week later it's still ok now!
Our second activity was with Static Eletricity and had two challenges. With our balloons, we had to create static electricity by rubbing them against various materials. The cadets tried wool -
And then they tried their hair! -
They then had to use the static electricity they had generated to 'catch' sequin fish, and then to repell a ping pong ball across the floor! (I'm sorry I didn't get any photos of this one - those ping pong balls are fast lol!)
My cadets definitely found hair generated the most static electricity!
Our third and final activity was Electric Artwork. Our mission was to create a glowing-eyed creature - using copper tape and LEDs to make a circuit we could connect up.
We scanned a copy of the circuit template first, so the cadets could make one each (as we had enough LEDs left over from the Sparky Sculptures activity) and we had just about enough copper tape to complete two circuits -
DS decided he would make a Creeper (from Minecraft - obviously!) -
Unfortunately, one of his eyes wasn't working, and we couldn't replace it without risking tearing the delicate copper tape, as we had already taped it in place. DS didn't mind, he still thought it looked cool.
DD made a vampire, with LEDs used from the previous experiment -
We did the activities on three separate days and spent an hour or less on each task. The beauty of these challenges though are that the children can do as much or as little as they want. For us, the kids spent almost an entire afternoon experimenting with making different electrical circuits through the conductive play-dough. As the kit also included making insulating play-dough it meant their was something to keep bored hands busy while they were waiting.
The fishing & ping pong ball chasing were great fun, and we sat down to write up our findings of those experiments. You could do a graph, to show which materials caught what amount of fish, if you wanted to expand the experiment in to maths. Or with a meter rule, measure how far you can repell the ping pong ball.
The electric artwork was fun as they could personalize it. The copper tape is tricky but not off-puttingly so.
What I love most about The Curiosity Box is that it is all done for you! As a Home Educator it falls to me to cover as broad a range of subjects as I can, and I freely admit that science was not my strong suit at school! I love that these boxes arrive at your door (or even fit through your letter box if you opt for the Nano boxes) which is exciting in itself for the kids. But the real beauty is they can tear straight into them - the instructions even tell you whether you will need the box for the experiment or whether you can dive right into your creativity with that!
It was wonderful to have a whole host of activities to dip in to, whenever we fancied, that required no pre-prep, no set up, very minimal mess and tidying away. What would probably be quite daunting in a busy school environment, is very accessible in these kits and whether you are Home Educating or not, the kids really enjoyed doing them. My DD wanted to do the Electric Artwork at the weekend, in place of computer time!! I don't think there is any higher praise I can give! xx


No comments:
Post a Comment